How to Use a Stud Finder Safely
Hanging heavy shelves, mounting a TV, or installing cabinets requires finding a solid anchor point behind drywall. Using a stud finder correctly prevents damage to pipes, wires, and your wall, ensuring a secure hold every time.
Quick answer
To use a stud finder safely, first calibrate it on a flat section of wall away from corners. Slide it slowly across the wall; the device will indicate the edge of a stud. Mark both edges to find the center, then confirm with a strong magnet or by tapping. Always check for live wires with a non-contact voltage tester before drilling.
Why trust ToolBuyerHub
- Flagged CAT rating and safe-use guidance wherever a tool is used near live circuits
- Battery & ecosystem compared
- Aggregated owner reviews
- Build quality & warranty checked
- Brand reliability
- No fake hands-on claims
Research updated June 2026.
What Is a Stud Finder and Why Do You Need One?
A stud finder is an electronic tool that detects wooden or metal framing studs behind drywall, plaster, or lath. It uses sensors to measure changes in density or magnetic fields. Without one, you risk drilling into empty space, hitting electrical cables, or damaging plumbing pipes. Using a stud finder is the first step to a safe, professional-looking installation.
How to Use a Stud Finder Safely: Step by Step
Follow these seven steps for accurate and safe stud detection every time.
Step 1: Choose the Right Stud Finder for Your Wall
There are three main types: magnetic finders (cheap, detect nails/screws), basic electronic finders (detect density changes), and deep-scan finders (detect live wires and metal pipes). For standard drywall, an electronic stud finder from Bosch or Stanley is reliable. For older homes with metal lath, a magnetic finder is safer.
Step 2: Prepare the Wall Surface
Remove any pictures, mirrors, or obstructions. Ensure the wall is clean and dry. If the wall has a textured finish or multiple layers of paint, the sensor may struggle; hold the finder flat and steady. Turn off any nearby electrical circuits if you suspect wiring is close.
Step 3: Calibrate the Stud Finder
Place the stud finder flat against the wall, away from corners, outlets, and baseboards. Press the calibration button (usually marked "Cal" or "Set"). The device will beep or show a green light. Keep your hand still and do not move the finder during calibration. This sets the baseline for the wall's density.
Step 4: Slide Slowly and Steadily
With the finder calibrated, slide it horizontally across the wall at a slow, steady pace (about 1 inch per second). Watch the indicator lights or listen for a beep. When the finder detects a stud, it will light up or beep continuously. Mark the spot lightly with a pencil.
Step 5: Find Both Edges and Center
Slide the finder from the opposite direction to confirm the stud's other edge. Mark that edge too. The center of the stud is halfway between the two marks. For a standard 2x4 stud, the center is roughly 1.5 inches from either edge. Use a level to draw a vertical line through the center mark.
Step 6: Confirm with a Magnet or Tapping
Use a strong neodymium magnet to find drywall screws or nails that are attached to the stud. The magnet will stick to the wall at the screw location. Alternatively, tap the wall with your knuckle; a stud produces a solid sound, while hollow areas sound empty. This double-check reduces false positives.
Step 7: Check for Live Wires Before Drilling
Before you drill, use a non-contact voltage tester (like a Klein Tools NCVT-1) to scan the area. Hold the tester near the wall; if it beeps or flashes, there is live electrical wiring behind the drywall. Adjust your drilling location by at least 1 inch to avoid hitting wires. Never rely solely on a stud finder to detect wires.
What to Check Before Buying a Stud Finder
Not all stud finders are equal. Consider these factors when choosing one for your projects.
- Detection Depth: Basic models detect up to 0.75 inches. Deep-scan models reach 1.5 inches, useful for thick plaster or tile.
- AC Wire Detection: Some models (like the Bosch GMS120) can detect live electrical cables, adding a layer of safety.
- Metal Detection: If your home has metal studs or pipes, choose a model with metal scanning capability.
- Display Type: LED lights are easiest to read. LCD screens show more detail but cost more.
- Battery Life: Most use a 9V battery. Look for auto-shutoff to save power.
- Brand Reliability: Bosch, Stanley, and DeWalt are known for accurate, durable stud finders.
Mistakes to Avoid When Using a Stud Finder
Even experienced DIYers make these errors. Avoid them for safer results.
- Skipping Calibration: Always calibrate on the exact wall you are scanning. Calibrating on a door frame or floor will give false readings.
- Moving Too Fast: Rapid movement causes the sensor to miss density changes. Slow down to 1 inch per second.
- Ignoring False Positives: Moisture, metal lath, or foil-backed insulation can trigger false positives. Always confirm with a magnet or tapping.
- Drilling Without Checking for Wires: A stud finder cannot always detect wires. Use a voltage tester separately.
- Forgetting to Mark Both Edges: Marking only one edge leads to off-center drilling. Always find both edges for a centered anchor.
Best Stud Finders for Safe Use
Based on aggregated owner reviews, brand reliability, and published specs, these five stud finders offer the best balance of accuracy and safety features.
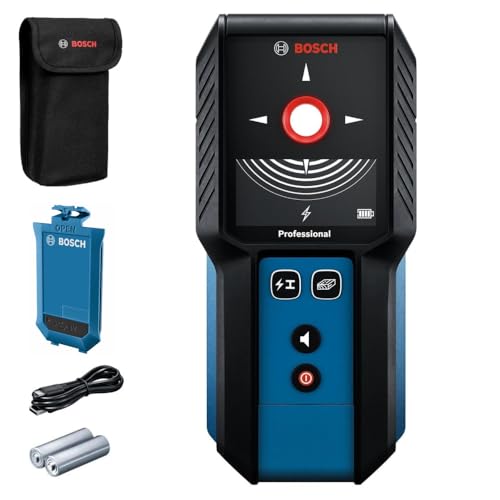
Bosch GMS120 Digital Multi-Scanner
Detects wood, metal, and live AC wires up to 1.5 inches deep.
Bosch GMS120 Digital Multi-Scanner
Best OverallPros
- Detects wood, metal, and live wires
- Center-find indicator for accurate marking
- Easy one-button calibration
Cons
- Higher price point
- Can beep on metal lath walls
The Bosch GMS120 is the most trusted stud finder among professional contractors and serious DIYers. It scans up to 1.5 inches deep and clearly distinguishes between wood, metal, and live AC wires. Owner reviews consistently praise its accuracy, with many noting it reduces false positives compared to cheaper models.
Its center-find feature is especially useful for safely mounting heavy items. The audible tone and LED display make it easy to use in bright or dim conditions. While it costs more than basic finders, the added safety of AC wire detection justifies the investment for most users.
Stanley STHT77422-1 FatMax Stud Finder
Best BudgetPros
- Affordable and reliable
- Simple one-button operation
- Compact and lightweight
Cons
- No wire detection
- Shorter detection depth
The Stanley FatMax is a solid entry-level stud finder that gets the job done without breaking the bank. It detects wooden and metal studs up to 0.75 inches deep, which is sufficient for standard drywall. Owner reviews highlight its ease of use and consistent accuracy for basic tasks like hanging pictures and shelves.
It lacks AC wire detection, so you must use a separate voltage tester for safety. The LED indicator is bright and easy to read. For the price, it offers excellent value, but it is not suitable for thick plaster or deep scanning.
DeWalt DW0100 Stud Finder
Best for Metal StudsPros
- Excellent for metal studs
- Durable build quality
- Ergonomic grip
Cons
- No wood detection mode
- No wire detection
The DeWalt DW0100 is a specialized tool designed for metal studs, making it ideal for commercial buildings or modern homes with steel framing. It uses magnetic sensing to pinpoint metal studs and drywall screws with high accuracy. Owner reviews note it is much more reliable than universal finders on metal surfaces.
It does not detect wood studs or live wires, so it is not a one-size-fits-all solution. The build quality is typical DeWalt: rugged and ready for job site use. If you work primarily with metal studs, this is a top choice.
Milwaukee 2237-20 Stud Finder
Best for Deep ScanPros
- Deep scan mode for thick walls
- Detects live wires
- Clear LCD display
Cons
- Bulkier than others
- Higher price
The Milwaukee 2237-20 offers a deep scan mode that penetrates up to 1.5 inches, making it suitable for plaster, tile, and thick drywall. It also detects live AC wires, adding a critical safety layer. Owner reviews praise its accuracy on challenging surfaces like textured walls and ceilings.
The LCD display shows the type of material detected, reducing guesswork. It is slightly bulkier than the Bosch GMS120, but the added features make it a strong contender for renovation projects. The price is higher, but the deep scan capability is worth it for older homes.
Bosch GMS 120-27 Digital Multi-Scanner
Best for PrecisionPros
- Pinpoint accuracy for center marking
- Detects wood, metal, and wires
- Auto-calibration feature
Cons
- Similar price to GMS120
- No LCD display
The Bosch GMS 120-27 is an updated version of the classic GMS120, offering the same reliable detection with improved sensitivity. It uses a combination of LED indicators and audible tones to guide you to the exact center of a stud. Owner reviews note it is especially accurate on standard drywall, with fewer false positives than other models.
It includes AC wire detection for safety, making it a complete package for most DIY tasks. The lack of an LCD display is not a drawback for most users, as the LED lights are intuitive. For precision work like mounting a TV, this is a top performer.
| Product | Best For | Detection Depth | AC Wire Detection | Rating |
|---|---|---|---|---|
| Bosch GMS120 | Overall | 1.5 in | Yes | 4.7 / 5 |
| Stanley FatMax | Budget | 0.75 in | No | 4.3 / 5 |
| DeWalt DW0100 | Metal Studs | 0.75 in | No | 4.4 / 5 |
| Milwaukee 2237-20 | Deep Scan | 1.5 in | Yes | 4.5 / 5 |
| Bosch GMS 120-27 | Precision | 1.5 in | Yes | 4.6 / 5 |
FAQs
Can a stud finder detect electrical wires?
Some advanced models like the Bosch GMS120 can detect live AC wires, but basic models cannot. Always use a separate non-contact voltage tester for safety.
Why does my stud finder beep everywhere?
This usually indicates a false positive caused by metal lath, foil-backed insulation, or moisture. Calibrate on a different spot or use a magnetic finder to confirm.
How deep can a stud finder detect?
Basic models detect up to 0.75 inches, while deep-scan models can reach 1.5 inches. For plaster walls, choose a deep-scan model.
Do I need to calibrate a stud finder every time?
Yes, always calibrate on the exact wall you are scanning. Calibrating on a different surface will lead to inaccurate readings.
Can I use a stud finder on a ceiling?
Yes, most stud finders work on ceilings. The same steps apply: calibrate, slide slowly, and mark both edges of the stud.
What is the difference between a magnetic and electronic stud finder?
Magnetic finders detect nails or screws, while electronic finders sense density changes. Electronic finders are more accurate for wood studs.
How do I find the center of a stud?
Mark both edges of the stud with the finder, then measure the midpoint. For a 2x4 stud, the center is about 0.75 inches from either edge.
Can a stud finder detect pipes?
Some deep-scan models can detect metal pipes, but they cannot distinguish between pipes and studs. Use a dedicated pipe detector for plumbing.
Is it safe to drill into a stud?
Yes
As an Amazon Associate we earn from qualifying purchases. We recommend on merit — see our disclosure.